Sportify Engineering Culture

They divided team members into focus autonomy squads who involve in full development cycle from implementation, deployment till maintenance for a system.
This not only increase the level of collaboration but also decrease the level of dependency to other teams.
They practicing release small and frequent which allows to spot integration problem early and invest heavily on automation test.

They believe in fail fast, learn fast, and improve fast.
Bad thing might happen unconsciously, instead of finding who is the culprit, fix it and learn from it will be the better spirit.
Healthy culture heals broken process, and healthy culture does not come easily, it need time, collaboration, trust…
OK… lets watch the video without further ado 🙂

Source : https://labs.spotify.com/
 

SpringData for MongoDB

Since there are numbers of tutorial out there to teach you how you can get simple MongoDB application up and running with spring data, so I’m not going to talk about it here, instead try to summarize Spring Data for MongoDB (v1.7) after reading it 🙂

Generally there are 2 way to perform tasks against MongoDB using SDMB (Spring Data MonggoDB) describe below:

1. MongoTemplate

Code snipped below show how easy we can insert, find and drop a collection in MongoDB using MongoTemplate.

@Document
public class Shop {

    @Id
    private BigInteger id;
    private String shopName;
    private String address;

    public Shop() {}

    public Shop(String shopName, String address) {
        this.shopName = shopName;
        this.address = address;
    }

    public BigInteger getId() {
        return id;
    }

    public void setShopName(String shopName) {
        this.shopName = shopName;
    }

    public String getShopName() {
        return shopName;
    }

    public void setAddress(String address) {
        this.address = address;
    }

    public String getAddress() {
        return address;
    }
}
@Configuration
@EnableMongoRepositories({"com.dicksonkho.repositories"})
public class MongoConfig extends AbstractMongoConfiguration {

    @Override
    protected String getDatabaseName() {
        return "shopdb";
    }

    @Bean
    @Override
    public Mongo mongo() throws Exception {
        return new MongoClient("localhost");
    }

    @Override
    protected String getMappingBasePackage() {
        return "com.dicksonkho.domain";
    }
}
@RunWith(SpringJUnit4ClassRunner.class)
@ContextConfiguration(classes = {MongoConfig.class})
public class TemplateTest {

    @Autowired
    MongoOperations mongoOperation;

    @Test
    public void testCRUDRecordWithTemplate() {
        Shop shop = new Shop("muimui", "Taming Jaya");
        mongoOperation.save(shop);
        Assert.assertNotNull(shop.getId());

        Shop insertedShop = mongoOperation.findOne(new Query(where("shopName").is("muimui")), Shop.class);
        Assert.assertEquals(shop.getId(), insertedShop.getId());

        insertedShop.setShopName("newmui");
        mongoOperation.save(insertedShop);
        Shop updatedShop = mongoOperation.findOne(new Query(where("shopName").is("newmui")), Shop.class);
        Assert.assertEquals(shop.getId(), updatedShop.getId());

        mongoOperation.dropCollection("shop");
    }
}

NOTE : MongoTemplate implements MongoOperations

  • When we insert new Post, MappingMongoConverter (default for MongoTemplate) will do the class / object type mapping, and save into MongoDB.
  • There are numbers of methods provided in MongoTemplate to deal with MongoDB, such as upsert, count, findAndModify etc.
  • It supported geospatial, GeoJson, and full text search queries.
  • It support map reduce operation to perform batch processing and data aggregation.
  • It provides methods for managing indexed and collection.
  • We can execute MongoDB driver’s DB.command using executeCommand and any exception will translate into Spring’s DataAccessException hierarchy.

2. Repository

There is a core marker interface for Spring Data repository abstraction called Repository, which then inherited by few sub-interface sort in hierarchical order as below:

Repository < CrudRepository < PagingAndSortingRepository < MongoRepository

Defining a query to manipulate data just a matter of declaring query method on repository interface.
Refer sample interface below, we will have a method for querying shop by shop name, querying shop name which start with some regex pattern, etc.

public interface ShopRepository extends Repository<Shop, BigInteger> {

    Shop save(Shop shop);

    Shop findByShopName(String shopName);

    Shop findOne(BigInteger id);

    Shop findByShopNameStartingWith(String shopName);

    List deleteByShopName(String shopName);
}
@RunWith(SpringJUnit4ClassRunner.class)
@ContextConfiguration(classes = {MongoConfig.class})
public class RepositoryTest {

    @Autowired
    private ShopRepository repository;

    @Test
    public void testCRUDRecordWithRepository() {
        Shop shop = new Shop("muimui", "Taming Jaya");
        repository.save(shop);
        Assert.assertNotNull(shop.getId());

        Shop shopByShopName = repository.findByShopName("muimui");
        Assert.assertEquals(shop.getId(), shopByShopName.getId());

        Shop shopByNameStartWith = repository.findByShopNameStartingWith("mui");
        Assert.assertEquals(shop.getId(), shopByNameStartWith.getId());
        List & lt;Shop & gt;
        deletedShopList = repository.deleteByShopName("muimui");
        Assert.assertEquals(1, deletedShopList.size()); // 1 record deleted

        Shop recheckTheShop = repository.findByShopName("muimui");
        Assert.assertNull(recheckTheShop);
    }
}

NOTE: Sample above extends the most basic Repository interface, but we can extends other interface like CrudRepository, PagingAndSortingRepository based on our need.

  • There are 3 types of query lookup strategies being use by Repository infrastructure:
    CREATE, USE_DECLARE_QUERY and CREATE_IF_NOT_FOUND (default)
  • There are numbers of method convention are available such as: findByXXXLessThan, findByYYYBefore, findByLocationNear, etc.
  • We can also create MongoDB JSON based query method to override the query method as sample below:
    @Query("{ 'shopName' : ?0 }")
    List<Person> findByShopName(String shopName);
    
  • Result of query can be process incrementally using Java8 Stream as return type.
  • Support integration with QueryDSL to provide type-safe query.
  • Support full text search.

Spring Data extensions (Web Support)

@Configuration
@EnableWebMvc
@EnableSpringDataWebSupport
@EnableMongoRepositories({"com.dicksonkho.repositories"})
@ComponentScan(basePackages = {"com.dicksonkho.controller"})
public class MongoWebConfig extends AbstractMongoConfiguration {

    @Override
    protected String getDatabaseName() {
        return "shopdb";
    }

    @Bean
    @Override
    public Mongo mongo() throws Exception {
        return new MongoClient("localhost");
    }
}

As you may notice, these configuration was exactly same as MongoConfig except 2 additional annotation (EnableWebMvc & EnableSpringDataWebSupport) which to enable spring data web support.

@Controller
@RequestMapping("/shop")
public class ShopController {

    @ResponseBody
    @RequestMapping(value = "/{id}", method = RequestMethod.GET)
    public Shop showUserForm(@PathVariable("id") Shop shop) {
        return shop;
    }
}
@RunWith(SpringJUnit4ClassRunner.class)
@ContextConfiguration(classes = {MongoWebConfig.class})
@WebAppConfiguration
public class SpringDataWebSupportTests {

    private MockMvc mockMvc;
    ObjectMapper mapper = new ObjectMapper();

    @Autowired
    protected WebApplicationContext webApplicationContext;

    @Autowired
    private ShopRepository repository;

    @Test
    public void getShopWithWebSupport() throws Exception {
        mockMvc = MockMvcBuilders.webAppContextSetup(webApplicationContext).build();

        Shop shop = new Shop("muimui", "Taming Jaya");
        repository.save(shop);

        MvcResult result = mockMvc.perform(get("/shop/" + shop.getId())).andReturn();
        Shop shopResponse = mapper.readValue(result.getResponse().getContentAsString(), Shop.class);
        Assert.assertEquals("Taming Jaya", shopResponse.getAddress());

        repository.deleteByShopName("muimui");
    }
}

See, we just need to pass in id as request parameter, and we get back the object without any additional coding. What it does was internally convert the path variable and access the instance through findOne() on repository instance.

Besides that, spring data web support able to resolve request parameter (page, size and sort) to Pageable instance which then allow us to use it to query list of object with pagination and sortable functionality (refer snippet below).

@RequestMappingpublic String showUsers(Pageable pageable) {
    ...
}

Lifecycle Events

There are few lifecycle event allow us to intercept an object before/after certain action take place.

public class BeforeConvertListener extends AbstractMongoEventListener {

    @Override
    public void onBeforeConvert(Shop s) {
        //change the state of object, or whatever
    }
}
public class BeforeSaveListener extends AbstractMongoEventListener {

    @Override
    public void onBeforeSave(Shop s, DBObject dbo) {
        // change the state of object, or whatever
    }
}

Reference : Spring Data MongoDB – Reference Documentation

Source code available @ github


Netbeans cannot find cordova or git on your PATH but your have already set it ?

You have already set the cordova and git in your PATH, but still facing above mention problem.
Try to rename .bash_profile to something else and restart netbeans.
If that helps, means you have some “dirty” code in your .bash_profile which you may remove it.
(as in my case, I have an echo statement which prevent me to create cordova application)

If it doesn’t, continue google 🙂

p/s: To confirm you have cordova and git in your PATH, there must be version number return when you issue command below in terminal (line by line):
cordova –version
git –version


Install Hadoop 2.5.0 in OSX & Ubuntu

Having multiple issue when installing hadoop in macbook last few of days, hence decided to build/package from hadoop source for my Ubuntu 14.04 and customise some configuration for OSX 10.10.1.
Here are the binary package if you need quick access:

Reference :
http://gauravkohli.com/2014/09/28/building-native-hadoop-v-2-4-1-libraries-for-os-x/
http://glebche.appspot.com/static/hadoop-ecosystem/hadoop-hive-tutorial.html
http://www.csrdu.org/nauman/2014/01/23/geting-started-with-hadoop-2-2-0-building/
http://hadoop.apache.org/docs/r2.5.0/hadoop-project-dist/hadoop-common/SingleCluster.html


Build Android app on Netbeans in OSX

Prerequisite: Have Netbeans installed in box.

1. Download Andorid SDK from Android developer site.
2. Extract SDK it to any place you prefer, eg: /usr/local/android-sdk
3. Create Android AVD emulator by running [SDK_PATH]/tools/android as below:

Click New and fill in virtual device field, then click OK

4. Setup NBAndroid plugin following NBAndroid wiki.
5. Create New Android project in Netbeans by goto File–> New Project –> Android
6. Fill in project detail and add target sdk platform if you haven’t, then click Finish to create a sample Android project (it will have some syntax warning upon project created).
7. Build the project will clear those syntax warning.
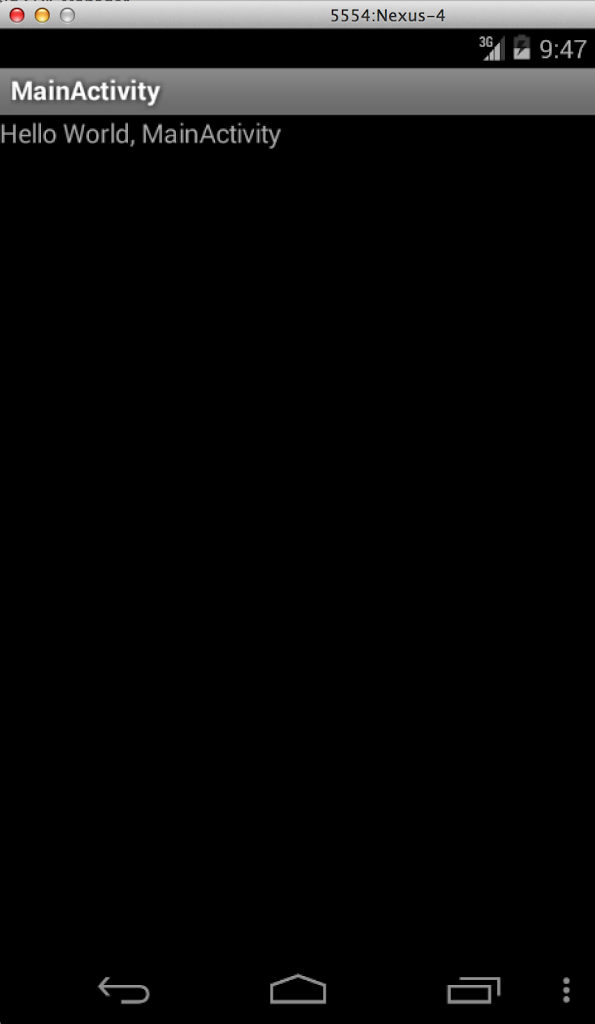
8. Run the sample Android app.
 

Websphere Auto Deployment with Websphere Rapid Deployment

After my post Netbeans with Websphere, I found there is an easier way to deploy/update your application by just drooping your ear or war or ejb (not tried yet) file into a pre-set directory, and that’t it. Websphere will do the rest for you.

Here we go :

1. Open command prompt / terminal, and locate your path to <WAS_INSTALL_DIR>/runtime/profiles/bin
2. Execute set WORKSPACE=C:autoDeploy (prior create folder)
3. Execute WRD-config.bat -project “project_name” -style “autoappinstall”
4. WRD configuration launch, and you need to input required field. (as image below).wrd-config
5. Workbench shutting down when WRD done it’s configuration.
6. Execute wrd.bat to start wrd.
7. You can drop your application ear/war/etc into C:autoDeploy<project_name>, and enjoy !Resource from : ibm info center


Websphere With Netbeans

After using eclipse for couple of months due to the reason it has websphere plugin which easier for publishing  code changes, I come back to netbeans as I feel I still love it. After hours of googling, I can’t really find an one stop setup, and decided to pen down here for sharing.

  1. Deploy your application war/ear via web console. eg : http://localhost:9060/ibm/console
  2. Find out where is the location after application deployed. eg :<WAS_INSTALL_DIR>/runtime/profiles/installapps/<NODES>/<YOUR_APP>
  3. Create an ant script for copying the compiled src or jsp to target found as step 2 above.

    <project>
        <project>
        <property name="source.web" value="C:/work/TestApp/target/TestApp">
        <property name="target.web" value="C:/IBM/SDP/runtimes/base_v7/profiles/was70profile1/installedApps/Node01Cell/TestEAR.ear/TestWeb.war">
        <property name="service.lib" value="C:/work/TestApp/Service/target/Service.jar">    
        <property name="target.lib" value="C:/IBM/SDP/runtimes/base_v7/profiles/was70profile1/installedApps/Node01Cell/TestEAR.ear/lib">
         
        <target name="Publish Web Module">
            <copy todir="${target.web}">
                <fileset dir="${source.web}">
                    <exclude name="META-INF/">
                    <exclude name="WEB-INF/lib/">
                </exclude></exclude></fileset>
            </copy>
        </target>
        <target name="Publish Library">
            <copy flatten="true" todir="${target.lib}">
                <resources>
                    <file file="${service.lib}">
                </file></resources>
            </copy>
        </target>
    </property></property></property></property></project>
    </project>
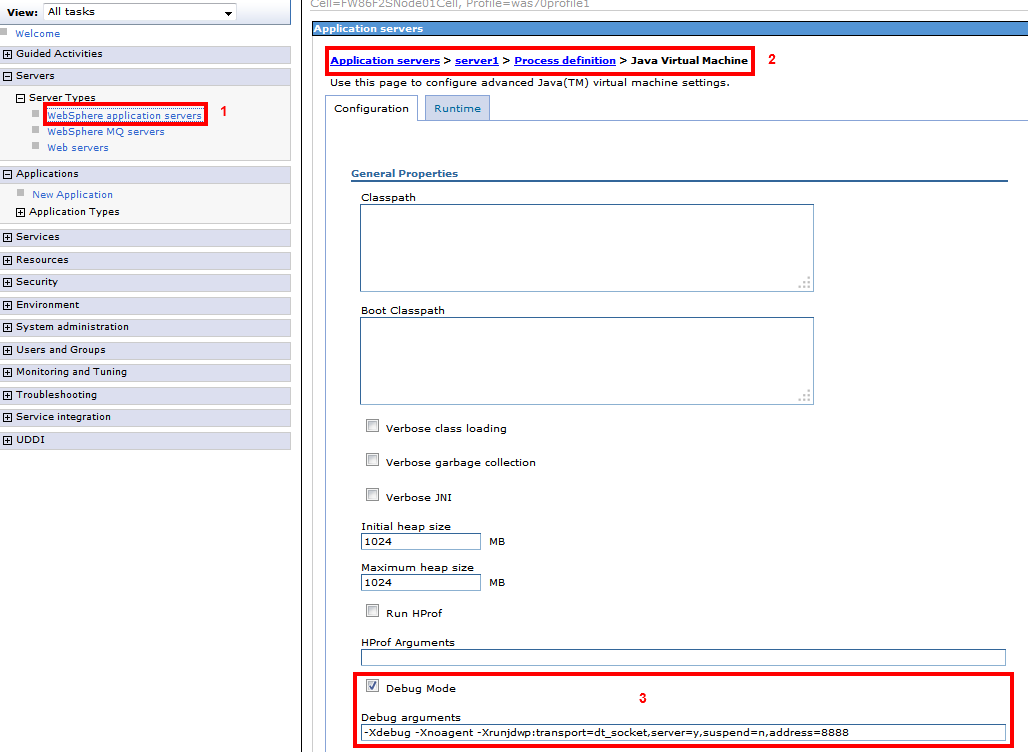
  4. Enable debug mode in Websphere (follow steps 1..2..3), then restart server.
    websphere debug
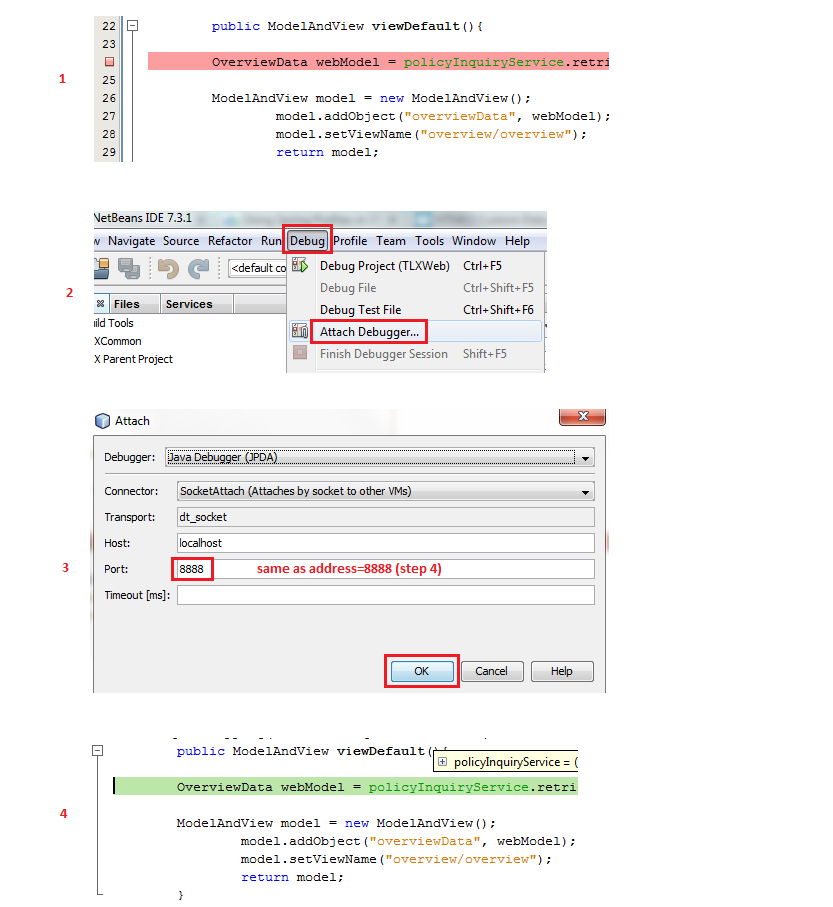
  5. Try on your netbeans (follow steps 1..2..3..4)
    netbeans debug
  6. Enjoy and let me know if I miss out anything 😉

P/S : I have attached the ant script which I use to restart server and publish the changes, you may change accordingly to suite your need. Click here to download


Ubuntu and cool package

Just installed ubuntu on my box recently, found it better than windows 7.
Package I installed as below (will keep updating, ~cheers~) :

  1. Skype
    sudo add-apt-repository “deb http://archive.canonical.com/ $(lsb_release -sc) partner”
    sudo apt-get update && sudo apt-get install skype
  2. Skype chinese character input (credited to mrxuri.com)
    sudo apt-get install ibus ibus-qt4 ibus-gtk
    sudo vim /etc/X11/xinit/xinput.d/default
    Then paste the text  into editor, save it and restart machine
  3. ISync (Google drive replacement)
    sudo apt-add-repository ppa:trebelnik-stefina/insync
    sudo apt-get update && sudo apt-get install insync-beta-ubuntu
  4. Cairo Dock (Mac OS X looks dock)
    sudo add-apt-repository ppa:cairo-dock-team/ppa
    sudo apt-get update
    sudo apt-get install cairo-dock cairo-dock-plug-ins
  5. Compiz Manager (Desktop effect)
    sudo apt-get install compizconfig-settings-manager
  6. Screensaver 
    sudo apt-get purge gnome-screensaver
    sudo apt-get install xscreensaver xscreensaver-gl-extra xscreensaver-data-extra
    sudo gedit /etc/xdg/autostart/screensaver.desktop
    (Paste 4 lines below and save the file)
    [Desktop Entry]
    Name=Screensaver
    Type=Applicaton
    Exec=xscreensaver -nosplash
  7. Synaps (Dash of unity)
    sudo apt-get install synapse
  8. Classic menu in Unity desktop (Since unity desktop does not have programs menu)
    sudo apt-add-repository ppa:diesch/testing
    sudo apt-get update
    sudo apt-get install classicmenu-indicator
  9. English to Chinese dictionary
    sudo apt-get install dict-stardic
  10. Cinnamon 1.8 desktop environment
    sudo add-apt-repository ppa:gwendal-lebihan-dev/cinnamon-stable
    sudo apt-get update
    sudo apt-get install cinnamon nemo
  11. StarDict (Chinese – English) dictionary
    Download and install StarDict here
    Download dictionary file here and untar it to 
    /usr/share/stardict/dic/
  12. GDebi (install *.deb package with dependency management)
    sudo apt-get install gdebi-core
  13. Media Codec
    sudo add-apt-repository ppa:gstreamer-developers/ppasudo apt-get update
    sudo apt-get install gstreamer1.0*
  14. Unity tweak tool
    sudo add-apt-repository ppa:freyja-dev/unity-tweak-tool-dailysudo apt-get update
    sudo apt-get install unity-tweak-tool
    Or download here
  15. Chinese input
    Refer here for more info
  16. If wine does not show Chinese application font properly
    Run : export LANG=zh_CN.UTF-8 before run wine xxxx.exe
  17. Install OpenOffice
    Download deb package here
    tar -vxzf filename (unzip it)
    sudo apt-get remove –purge libreoffice*  (uninstall pre-installed libre office)
    sudo dpkg -i *.deb (cd to unzipped dir and install deb package)
    cd desktop-integration (cd to dir mentioned for menu integration)
    sudo dpkg -i *.deb
 

Java Generic : Can and Can’t

// Assumption : Dog and Cat extends Animal


// SENARIO 1
List<Animal> animalList = new ArrayList<Animal>(); // YES
List<Animal> animalList = new ArrayList<Dog>();    // NO : Reason 1


// SENARIO 2
List<Animal> animalList = new ArrayList<Animal>(); 
animalList.add(new Dog()); //YES
animalList.add(new Cat()); //YES
   

// SENARIO 3
List<Dog> dogs = new ArrayList<Dog>(); 
dogs.add(new Dog());
sendBackHome(dogs);  // YES
sendBackHomez(dogs); // YES
sendBackShop(dogs);  // YES
sendBackShopz(dogs); // NO : Reason 2

static void sendBackHome(List<Dog> animals){
    ... 
}

// Wildcard allow any type pass in as parameter but cannot add
static void sendBackShop(List<? extends Animal> animals) {
    animals.add(new Dog()); //NO : Reason 2
}

// Wildcard allow any type pass in as parameter but cannot add
static void sendBackHomez(List<?> animals){
    animals.add(new Dog()); //NO : Reason 2
}

static void sendBackShopz(List<Animal> animals){
    ...
}

static void sendBackShopz(List<Object> animals){
    ...
}


// SENARIO 4
void sendBackHome(List<? extends Serializable> animals) {}    //YES
void sendBackHome(List<? implements Serializable> animals) {} //NO


// SENARIO 5
List<?> animals = new ArrayList<Dog>();               // YES
List<? extends Animal> animals = new ArrayList<Dog>   // YES
List<? super Dog> animals = new ArrayList<Animal>     // YES

List<? super Animal> animals = new ArrayList<Dog>;    // NO
List<Animal> animals = new ArrayList<? super Dog>;    // NO
//Wildcard notation cannot used in object creation


// SENARIO 6
public class Zoo<T extends Animal> {    
    public static void main(String[] args) {
        Zoo<Dog> zoo = new Zoo<Dog>();          // YES
        Zoo<Integer> zoo = new Zoo<Integer>();  // NO
    }
}


// SENARIO 7
public class Zoo<T extends Serializable> {} // YES
public class Zoo<T implements Serializable> {} // NO


// SENARIO 8
public class Zoo<T extends Animal> {} // YES
public class Zoo<? extends Animal> {} // NO


// SENARIO 9
public class Zoo {
    public <T extends Animal> Zoo(T t){} //Constructor
    
    public static void main(String[] args) {
        Zoo zoo = new Zoo(new Dog());            // YES
        Zoo<Dog> zoo = new Zoo<Dog>(new Dog());  // NO
    }
}


// SENARIO 10
public class Zoo {
    public <T> void addAnimal(T t) {
        List<T> animals = new ArrayList<T>(); // YES
        animals.add(t);
    }
}

public class Zoo {
    List<T> animals = new ArrayList<T>();    // NO
    public <T> void addAnimal(T t) {
        animals.add(t);
    }
}


/* 
-------------------------- APPENDIX --------------------------


Reason 1
--------
Generic type of reference and object must identical.


Reason 2
--------
Due to type erasure, "animals" only recognize it's based type 
which is ArrayList ONLY during runtime, and no other generic type. 


Let's imagine senario below:
When we write this:


    static void sendBackHome(List<Animal> animals){
        animals.add(new Cat());
    }

   
When runtime, what jvm see is only base type, 
NOT generic type due to type erasure


    static void sendBackHome(List animals){  
        animals.add(new Cat()); // now it content Cat and Dog object
    }


See the problem ? 
List<Animal> animals able to add Cat object.
when we try to process, animals list, which object should we cast?

*/